DIY Easy Build Kids Swing

As promised this project should prove a fun one. At least for someone, be it your little one, the neighbors kid or your grand kids. Again for a friend, this is something I wanted to make for the little ones in their life who's about 2 years old, maybe a tad over 2 and a new born that can enjoy it when she comes of age. It's made from a rectangular plastic crate and some scrap wood. I'll walk you through how I built the one I made as it's really not that difficult. You can knock it out in a day less applying the finish of course. So lets get to it...
The crate is one the person I made it for had lying around collecting dust. You can make one out of a plastic square milk crate but what I like about this particular crate over the standard plastic milk crate is A) It's retangular so when cutting out the area for their legs it maintains strength on the corners. B) the sides are quite as high as a milk crate so you can add arm rests.
You'll notice I didn't put a safety bar across the front on this one nor does it have the little strap that goes between their legs that attaches to that safety bar. It doesn't mean you can't add one, you can and I would recommend you do if your child isn't ready for an open front swing. I'm no expert on what age or what height or who's kid can ride in what swing. With the research I did, it seemed the consensus is that kids 2 years old and under should be in what they call a toddlers swing. Those are the ones with safety bars on the front and the strap between their legs.
The child that will be using this swing, and has used this swing, is just over two years old and from what I read will soon be ready for a standard swing. Which is somewhere around the age of three. So... The lower sides, the open front so she can start learning how to swing on her own... to me... is just right for her. And since I'm the one building the dang thing.. enough said. You have to make the call for your little one(s) if you want or need a safety bar or not.
So where do you get a plastic crate like the one I used. Funny you should ask because I wondered the same thing myself. So I searched the web high and low and found out, you can get this crate. And it comes in two colors. Grey like the one I made this one out of, or they have one in the color red as seen below:

Here's the Product information on the crate:
Mesh Straight Wall Container
Model Number: S-20632R (R for Red) or S-20632GR (GR for Grey)
Measurements: 16 x 12 x 8.5 inches
Manufacturer: Akro-Mils
Load: 30 lbs / Stacking load 400 lbs
They're designed to cube out a 48" x 32" pallet. But in this case, they're for a swing.
At the time of this writing Grainger does sell them individually but only has grey listed. Price is $21.99
Uline has them for $16 each if you buy 3 and they have both Grey and Red listed.
The one I used and am referring to above has a mesh bottom. Listed at Grainger it seems they make these as well with a solid bottom ( Model # 37278GREY) and with solid bottom and sides (Model # 37288GREY) I don't see why either one of those wouldn't work just as well. In fact, if you're making this for a porker of a kid, you may prefer one of those over the meshed as the load capacity goes up from 30 lbs to 83 lbs with either the one with solid bottom or solid bottom and sides. You know your kid better than I do so pick your poison and lets get on with the other materials you need for this build.


Adding the Rope to the Swing:


- You'll need some scrap 1 x 2 (pressure treated if you're going to leave it outside) for the arm rest which also locks the rope in place.
- You'll need a piece of 3/4 inch exterior grade plywood. Large enough to cover the bottom on the inside.
- You'll need part of a broom handle for... the handles. about 8 inches will give you room to spare. Got two brooms, cut 4 inches off each handle... round over the tops of what's left and you can probably still use them fine. Or go out and buy a 3/4 inch hard wood dowel to use if you don't have a broom handle to spare.
You'll need 10 - #10 x 1.25 inch SS Pan head sheet wood screws, though sheet metal screws will be fine. That's what I used.
You'll need 4 - #10 x 3/4 inch SS Pan Head Screws.. again wood screws or sheet metal screws will be fine if you don't have wood screws.
Rope... I used 3/8 inch braided rope. You may want to use 1/2 inch rope. It's entirely up to you. I found I picked up 30 feet in total, 3 10 ft packs, from somewhere on clearance. Try and get decent rope. I went with braided, you can use three strand if you like. Again it's up to you. The better rope isn't stiff and doesn't stretch as much. The better stuff is at the boating supply house but it is more expensive. Quite a bit more in fact.
I used one ten foot length for each side to make up the triangle. And one cut in half to make up what hung from the tree. The branch picked to hang the swing was only 6 ft from the ground so... it depends on the height to the tree limb or what ever you're hanging it from as to how long that third piece needs to be. And if you are tying knots, you need to allow some length for each and depending on the knot and size rope, you may be surprised as to how much rope you'll need per knot.
In this material list there's some optional hardware. It depends on how fancy you want to make it. I tend to over build in a way. I like stainless steel which costs considerably more than if you buy zinc plated steel so... just bear that in mind. You don't have to use SS. I did. Anyway, I'm going to go through how I built it, and the materials I used to make things easier. There are less expensive and other ways to do things, just keep that in mind. If you don't want to use this or that, or want to use one made from a different material or want to just tie a knot instead of buying hardware, do so. This is just how I did things and what I used. Carrying on...
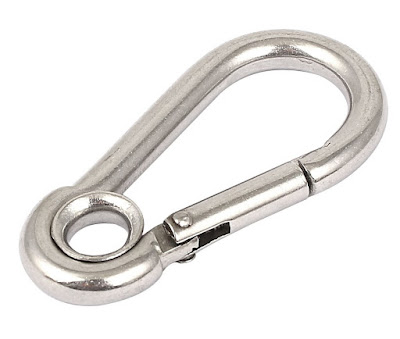
I used 4 - Either 5/16" or 3/8'' (I don't remember exactly which) Stainless Steel Snap Hook Carabiner Clip Links with Eyelets. They look like this..

I used 2 - Sea Dog Nylon 3/8 inch (closed) thimbles - Something I wanted to try.

You can get metal thimbles as well.
Two 16 x 1 inch straps to go around the tree branch, this is really dependant on what you're hanging the swing from and how big the branch is... in my case a couple tie down loops from Harbor Freight worked out great. For $3 you get 4 in the pack and the working load strength is 800 lbs. Breaking Strength is 2.400 lbs. Plenty strong for this purpose. Made by Haul Master. Here's a pic...

You need some odds and ends like whipping string if you want to whip the rope as I did. Some tape to mark the rope lengths and knot points. A couple small scraps for the rope cinches, hardwood if you have it but softwood may work as well if the grain is right. You'll need whatever you want to finish the wood with. And a cushion of some kind for the seat. I used a cushion I found at the thrift store that was in like new condition and double sided. I take it it was from a kids car seat or stroller or something along those lines. Oh, you'll need some snaps to hold the cushion on. I'd went with SS snaps. Boating supply houses have them. You can find them on Amazon as well.
I believe that about covers the materials... Now onto the build itself!
First things first is to cut out the front. And a note here. You could just cut out the mesh if you're making this for a toddler and want the cross safety bar. Then lash a strap to the underside of the handle part. Just a thought...

I used a small cordless circular saw to cut the bulk out using a speed square as a guide. Then followed up with a jig saw to finalize the corners.

First thing you'll notice is the bottom of this crate is lower than the angled edge in the front.

If you were to leave it as such, you're kid would have their legs blood cut off in no time and I can well imagine it wouldn't be too comfortable to boot. So lets take a look at how we can overcome this issue. Or rather how I went about it. Maybe you can come up with a better way.
You'll see the depth past the angled lip is just over an inch...

A piece of 3/4 exterior grade B/C plywood scrap will bring the bottom up to with-in a 1/4 inch or so. Add the cushion, it should be fine. If you have a piece of full 1 inch, that should work as well. Personally, I had some left over 3/4 inch exterior grade plywood already varnished up so I cut the bottom from that. Don't have a table saw? No problem, a straightedge and a circular saw will work just fine for this.

A quick look see inside the crate, the rope will to go through the solid square in the corners. You'll also see you need to round the corners of the plywood you cut so it will fit.

You may have to break the edges on the bottom of edge of the plywood to get it to fit flush. And you will have to round the corners as mentioned. Just take your time and get a nice fit.

Next we want to attach the plywood to the crate using the 4 - #10 x 3/4 inch screws. I went through the side rather than the bottom. You need to drill a pilot hole and you may want to clamp the plywood bottom to the crate in doing so to hold it tight to the bottom. Now once you have the pilot holes drilled for the screws we need to make a cut out for the screw head. Use a 1/2 inch bit and just use it like a grinder in your drill. holding it firm the plastic will eat right away. In this next pic the screws are installed and you can see the cut out for the screw head I'm referring to. Clean up the cut outs with a razor knife if you need to as well as any edges you cut earlier.

And here is a view of the plywood bottom once installed from the topside...

And the new measurement from the edge with the plywood bottom in. It's right at 1/4 inch and with the cushion, it should prove to be just fine...

Now lets drill the hole for the rope. I used a 3/8 inch Forstner Bit as I wanted a clean hole through the plastic and plywood. You'll want to to drill the holes close to the corner but enough into the plywood board it acts as a strong hold. Also don't drill all the way through, Drill through the plastic and just far enough into the plywood you see the center point of the bit poke through the other side. Then drill from the other side to complete the hole. That will prevent break out in the plywood. Optionally you can remove the plywood bottom after drilling half way through, put it on a backer board and finish the hole that way. If you have a backer board when you go through the plywood, you will get minimal or eliminate break through entirely if you clamp it before drilling.

Next I made the armrest /upper rope holders from some scrap 1 x 2 50 year old Dade County Pine.
There's a little trick on the ends to get them to fit correctly. There's a slight angle to the crate. I can't remember what it is, but I believe it's around 2 degrees. Maybe a degree or two more. It's not much but it's enough that if you don't cut it into the ends of the armrest, it won't fit flush. Once you have them fitting correctly mark the hole for the rope to pass through. It should be directly above the holes you made in the bottom.
Drill the holes in the armrest using a 3/8 inch Forstner Bit or a Brad Tip Bit for a clean hole. Drill it with it right up to the edge of the armrest. Then cut it straight to the inner curve with a jig saw. Or file it out. Like so..

Next we're going to make the handle holds. Now in saying this, I didn't put handles on or even think it needed them until after it was finished and the little one tried it out. Seeing how she was gripping the rope.. I felt there was a better solution. So I took it all apart and added the handles.
3/4 inch broom handle is what I used. Cut to 3.75 inches in length and rounded over on one end. Scrap or final sand off any paint that's on it, if using a new 3/4 hardwood dowel you won't have to deal with this. Be careful not to sand too much wood that it becomes loose in the hole in the armrest. That hole on mine is 2.5 inches back from the front edge of the wood. NOT the crate! Centered on the armrest.
In painting the handles mask just past the thickness of your armrest. You want the paint to go just past the edge when you glue it it. I chose to paint the handles with Krylon Gloss White Enamel. Three Coats then sanded and another three coats to make it nice and smooth. An easy way to paint them is to tape them to a scrap piece of wood that will stand up when spraying them. Like so..

Next glue the handles into the armrests using a waterproof glue such as TiteBond III. I made sure the grain face was facing the long edge as I added an extra measure and put a flat head construction screw through the side of the armrest and through the handle once the glue dried up a bit just for safe measure.

You'll want to sand the bottom side of the handle flush with the armrest.

Once all that is done, you might as well finish the bottom and armrests themselves. Especially if you are planning on leaving the swing outside. Take care to seal and finish all sides and end grains. Mask the handles once they've cured up a day or two.
Starting to look like something ain't it!? That's a rhetorical question.. of course it is!! It's looking great! The kids going to love it!

Time to mount everything... Put the bottom back in.
Clamp an armrest in place.
Now drill the pilot holes for the #10 x 1.25 inch pan head screws which will secure the armrest to the crate. Five screws per armrest. One at each end, Three on the side with one in the center. The other two get close to the rope holes but not too close you split the wood. Do the same for the other side. Once the armrests are installed it should look something like this, less the rope and snaps of course..

This is where it gets a little tricky. I don't know if there is a certain formula for the height the rope should be to the eye. I knew the the height of the child sitting down. I wanted the eye to be over her head incase I was going to add a safety bar at the insistence of the parents. Hey, it's their call. First kid, parents get weird protection wise. Well some. Mine tried to drown me in the tub by the time I was 3 so.. At least one of mine wasn't so concerned about safety issues when I was coming up. But other parents can be on the extreme the other way... So..
I made the eye so it was 24 inches from the bottom of the seat. Added a foot and a half for the knot I waa going to make. Total of 7 feet needed. I folded the rope in half and whipped in the thimble after pre-stretching the rope. And you really have to stretch the rope and for sure it will stretch even more. Especially with cheap rope like I had.
I'm not going to get into how to whip a thimble into the rope it goes beyond the scope of this post. It's fairly easy to do once you know how. However, I will say this, you need to make sure both whips are the same exact length and and the same count of wraps for each thimbled eye. Count the wraps as you go on the first one, duplicate the count on the next one. Mark the start point. I used mason line for the whipping as it's a little thicker and stronger than standard whipping line. When done, mine look like this...

Next I measured 24 inches from the top of the thimble on each leg of rope. Marked the line. Added painters tape to help me see the mark and maintain the mark as I made the stopper knots once the line is threaded through the armrest and bottom.
Speaking of stopper knots. There are a few you can choose from. Some are very very simple, others like the one I used, more complicated but not so much you can't do it. But it will take some effort and patients to tie it and have it tight in the right spot. It will require either a marlin spike or you can use a phillips screwdriver if you don't have one. No matter which stopper knot you chose to use, ALL 4 legs of the line must be equal or the swing will not swing correctly.
Here is a link to some stopper knots you an choose to use on Animated Knots. Look through them, the instructions are animated. Try one, if you don't like it, try anther. The stopper knot you choose will also depend on the size rope you picked out and length of line you left yourself to tie it.
The Ashly looks great but is difficult to get to mark. The Estar Stopper Knot is easier to get to mark but can be very tough to tighten, the tighter it gets the harder it gets. Simple ones would be something like a Double Overhand Stopper or the Stevedore Stopper.. though the Stevedore can be tough to get on mark because of how it is tightened.
I'll give you an example of correct and incorrect with the one I tied, the Estar Stopper. If you find that your knot once tight is something like below, you have to tie it again or loosen it up and move it on the line. You missed mark.

This is what it should look like when you hit mark:

It can be frustrating to hit the mark when tying a knot. Just be patient. if it gets too frustrating, walk away, take a breather, come back and try again. You'll get it. All 4 stoppers must be on mark.
When you're done with the stopper knots, we can now add the cushion. And it's easy to do.
To add the cushion, we want to add some snaps to it and to the seat bottom. It takes 4 snap sets. I don't know about your area but here, finding the stainless steel snaps was easy. Boating supply houses have them. Finding the setting tool with the stainless steel snaps for those snaps... a bitch. Personally I wasn't whiling to drop $85 for a snap set to put 4 snaps in a kids swing as they wanted at the boat supply house.
They use to sell good SS snaps with the set tool in small packs but I couldn't find but one at the big box store hardware store. Which is what I used but don't recommend because though they are SS or suppose to be, they are cheap thin ones. At any rate these by Bostitch are what I used.

Easiest method I found to locate where the snaps were to be placed was to first set your cushion in place and start at one corner and work your way around. Punch a hole for the snap in the cushion and set it. do the same to the left side. Then the back two trying to get them evenly spaced and as square as possible. Once all 4 are in the cushion, I added the mate with the screws to the wood seat. Starting with the front right corner, then the left front corner and so on. I use a little trick to find where it goes under the cushion as you can't see to mark the center. I take a Sharpy and coat the snap edge that is facing the wood with ink. Like this..

Making sure the cushion is where you want it, press the snap so it leave a mark on the wood. Like so..

The center of that circle made by the snap is where you put the screw. Once you're finished putting the mated snap side in the wood. Snap your cushion in and the swing itself, is done! Hurray!!

Next we move onto the final phase. Putting the hardware on the rope that hangs it, making a either a 2 hole or 3 hole cinch for ease of adjustment and hanging it properly.
First lets make a set of rope cinches out of wood. You can buy metal cinches, plastic cinches, but it's easy to make them from wood. You can even tie a knot that is a adjustable cinch. You can use a Truckers knot instead of a cinch. There's a multitude of methods to the madness, this is just one or two of them.
Two hole and three hole sliding cinches. This is what they look like.

I wasn't sure which I wanted to use so I made both. They are made from 1 x 2's. They have a 3/8 holes for the line. My rope is 3/8 inch, you'd want a larger piece of wood and a 1/2 inch hole if your rope is 1/2 and so on.
Ideally the cinches would be made from a hard wood like oak or the like and the holes would be drilled through the face of the grain which would, like the ones seen here, be running lengthwise. But there's really not that big of a load on these, and the wood is very old and well seasoned and has a decently tight grain for a softer wood. The ones I made should do fine.
A two hole cinch will allow you to very easily slide the rope to what ever length you need. However it doesn't lay as flat as a three hole cinch when under tension.
This is how the two hole is put in the line:

The loop is towards the tree branch, where the orange and black strap is.
A three hole cinch works on pretty much the same principle and is put in the line the same way. The exception is the rope goes back through the cinch and in order to make adjustments, you pull it through. A little more difficult than a two hole to adjust, but they are both pretty easy.

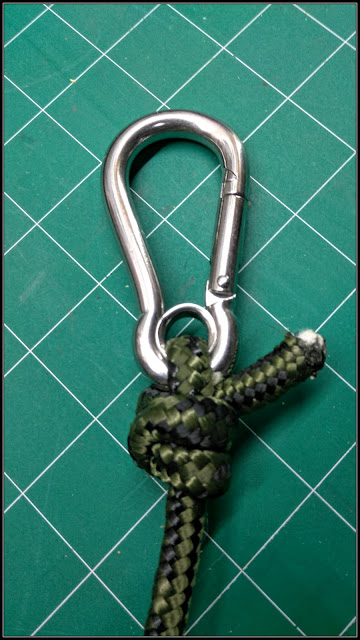
The knot I used to tie the cinches on is the same I use to tie the Snap Lock Carabiner on to the other end of the rope that connects to the swing eye with. The knot is called a Halyard Knot. You can see how it's tied at this link to Animated Knots.
Notice the tape on the end of the line, that's from when I cut the line. Leave it on till after you melt the end if it's a synthetic line made of nylon or polyester or a mix there of.
Pick your poison as far as cinches go. If you prefer a different type or method, go for it. This is the end that goes to the tree or whatever you are hanging your swing from and allows you to adjust the height. That said, both lines must be the same length. The height you are adjusting is the height from the ground. I'll get into more on that in a bit.
When it hung, it looks like this...

The end that goes to the swing and hooks to the eye, looks like this...

Now, I want to mention here, you don't have to use a snap link on the side that connects to the eye of the swing. I wasn't sure if the owner wanted to just take the swing down or the whole thing down and I wanted to make it easy for them to do so. As an alternative and somewhat just as easy to remove one could use a quick link like this:

The above one is stainless steel but they come in zinc plated as well as galvanized which are less expensive. You'd tie the line in the same manor you would tie the Snap link on.
Another alternative is to tie directly to the eye. Or tie a bowline knot. You don't have to use any hardware for this point. I wanted the swing itself to be easily removable as mentioned. And quite honestly this is the first swing I ever made so when getting hardware and building it I wasn't exactly sure what I needed so I bought everything to save a trip to the store and took back what I didn't use.
Hanging the Swing:
You're done building the swing, now it's time to hang it. There's some rules of thumb you need to keep in mind when hanging a swing. And some helpful tips. That's what I'm going to go over now.
1) Prestretch the Rope. As mentioned earlier in this post, in using rope for your swing it will continue to stretch for 2 to 3 months depending on use. You can help it along by pre-stretching it. Loop the rope around a hitch on your car, or a tree and have a tug of war with it. Cheaper lower grade ropes will stretch more than higher grade ropes. Higher grade ropes usually cost more.
2) All lengths must be Equal. All the rope lengths must be equal, if not, it will swing crooked. It's also one cause for the seat not being level. From the stoppers on the bottom of the seat to the swing eyes must be the same length. From the swing eyes to the pivot point ( tree, beam, pole, whatever); must be the same length.
3) Pivot Points need to be Level. If the ropes are all the same length it stands to reason for your swing to be level, the pivot points need to be level. If your rope lengths are equal and your swing seat is not level, then that's an indicator your pivot points are not level.
Usually this a problem when hanging from a tree limb that is crooked or inclined but you can find this when hanging from a swing frame or beam as well. The correction is not to make one rope longer than the other. That will cause the swing to swing crooked as mentioned. You need to correct the pivot points and make them level. There are rather simple methods to correctly level the pivot points on a inined or crooked tree limb. I'm not going to get into it here, just Google "swing swinging crooked" and solutions will come up in the search results.
If it's swing frame or beam, well you put it up wrong, find out what's not level and correct it.
4) Twisting. You may want your swing to twist and spin, you may not. It's fun to twist on standard two rope swings. Usually its swings with long ropes or chains that twist best. To make it twist easily, simply have your pivot points equal to the rope spread on the seat. Example: If the spread between the rope is 12 inches on the seat, make the pivot points 12 inches. The longer the rope to the pivot points, the easier and more twisting/spinning can be done.
To help prevent twisting on a swing such as this or a toddler swing, make the pivot points 2 to 4 inches wider than the spread between the ropes at the swing. The longer the ropes the wider the spread. For example on this swing with a 12 spread at the swing and a 6' length of rope to the tree limb I made the pivot points 14 inches apart. Two inches wider than at the swing seat. If the rope where longer, I'd make it a wider spread up to 4 inches is the rule of thumb.
5) Swing Swings Crooked. IF your swing is swinging crooked, check points 1, 2 and 3 to find the problem.
6) Have Clear Room around the Swing. You want enough unobstructed room all around the swing so they can swing safely. Don't hang it a foot from the trunk of the tree or three feet from in front of the pricker bush or 3 feet from fence behind the swing. Rub a couple brain cells together on this one folks. Hang it where they can swing safely and if they jump off, don't land in a pricker bush or pile of rusty nails or glass shards. If you can put sand down that they can jump into great. If not, grass is fine if it's clear of twigs and branches and nails and glass in my book. Give the swing some clear space around it.
6) Swing Height from the Ground. How high off the ground should your swing be? And actually there are recommended minimums and heights. You can look them up and go by their recommendations if you want. I believe its a 12 inch minimum and 14 to 16 inches depending on age. But I feel its not age but more their height that is relevant as to how high you want it from the ground. Bu that's my thinking and I'm no expert of the subject of swing height.
Toddlers swings are hung high, not to keep the kid from climbing in, but so the parent doesn't have to bend over so far to push them.
Standard swings are closer to the ground obviously. I don't know about anyone else, but I have pulled a face plant or two as a kid on swing that was too low for me. You get to swinging real high and just playing stretch your legs and point your toes and lean forward like your flying on the downward arc and WHAP! Instant face plant as your toes dig in at the bottom of the arc folding your legs back and face into the dirt and knees all scraped up. Something like that tends to ruin the swinging experience for the day. You may want to prevent that from happening to the kid using your swing.
What I did to set the height for the little girl using the swing I made was this. I started out at 12 to 14 inches from the ground for a ball park height. Top of the kids butt height. Then I had her get on the swing, stretch her legs out straight and point her toes and hold on while I simulated the lean of a downward arc and looked to where her toes were. I raised the seat so her toes where about 3 inches off the ground when I did this.
She doesn't know how to push off when getting into the seat or how to swing yet, but I checked she could still easily pull herself up into the seat. The rest she needs to learn and will over time. It's a little high for her but I'd rather be safe than sorry as she face planted when I had it lower. She was fine and laughed about it. For now till she learns how to swing and all that goes with it, 3 inch clearance is good for now.
7) Check often for Rope Stretch and Seat Height. As mentioned the rope will stretch. In doing so this will change the seat height. It's not a set it and forget it kinda thing. Check it every day they use it for the first couple months and perhaps weekly there after. Adjust the height as needed. Tend the lines and make sure nothing is frayed or about to break. That the tree limb is good and so on. Pivot points are still level and the spread still correct.
On a side note here, you can teach the kid(s) to let you know if something isn't right so it can be fixed or adjusted promptly, even early on in years. Like the seat is too low or the rope is about to break. Simple stuff. But double check yourself regardless and show them what to look for.
I may be wrong as I don't have kids but to me there's nothing wrong with teaching a kid the maintenance part of ownership. They don't have to grow up to be a mechanic to learn or instill in them part of ownership and having things is taking care of what they own or play with. So involve them with learning that side of things isn't such a bad thing. But hey I'm just speaking off the cuff here, as mentioned, I don't have kids, it's your kid raise em how you want.
That's pretty much all I can think of.
Now that's built, just let them have some fun. Have patients with them in teaching them how to swing. Enjoy the moment... or moments. And heck, you made a kid a kick butt swing out of plastic crate that smokes the one at the kids toy box store!
Speaking of, here's a couple more pics of the swing before I sign off...


One other thing before I close this post out. You can add embellishments to the swing. I was going to add some stars to this one but I felt it looked more for a boy than a girl if I did. Which would be fine if she was a boy, but she's not. I may add some artificial flowers to it. Wrap vines and flowers up the ropes, like you see some princess swinging on in the cartoons and movies. That might be cool.

What would be really cool and I almost did this.. as I was this close to going for it was to put battery operated lights on it and up the ropes for night swinging. I had it all thought out. I was going to add momentary button switches to the top of the handles like a old joy stick and run the wires though the handle and under the armrests to lights. A press of the thumb would turn on the lights controlled by that switch. I still think it would be cool to do, and not super expensive for the parts or lights. But I realized I was getting a little carried away. Well, for now and this particular swing anyway... But maybe you can do it to yours and show me up on my swing build. lol
I'd love to see it if you do do something like that to your swing build. So share it with me if you do.
And lastly here's a pic of it packed up after a day of swinging...

It's easily portable. It's not limited to this one tree. It can be taken with to the park or where ever they travel to. And very easy to hang and there's enough rope to hang it from a fairly easily reachable limb or beam up to 8 feet in height or there abouts.
Okay people that's all for this one. I hope it wasn't too long of a post and you got something out of it.
Till next time,
Stay creative, and most of all, Stay Happy!
cheers...
Comments
Post a Comment