Birdhouse Firewood Rack Side Extensions
Before I get into the next project I wanted share an update to the Birdhouse Firewood Rack I just finished up for those wanting to build a firewood rack as I did. Again built from scrap wood, it's a very easy add on to build out. The extensions give you some additional options in designing and building yours and hopefully help you plan your firewood rack to the size space you have and amount of wood you want to store. I actually like it a tad better with the extensions, than without. Additionally, the extensions are easily removable and take up little space to store them until needed.
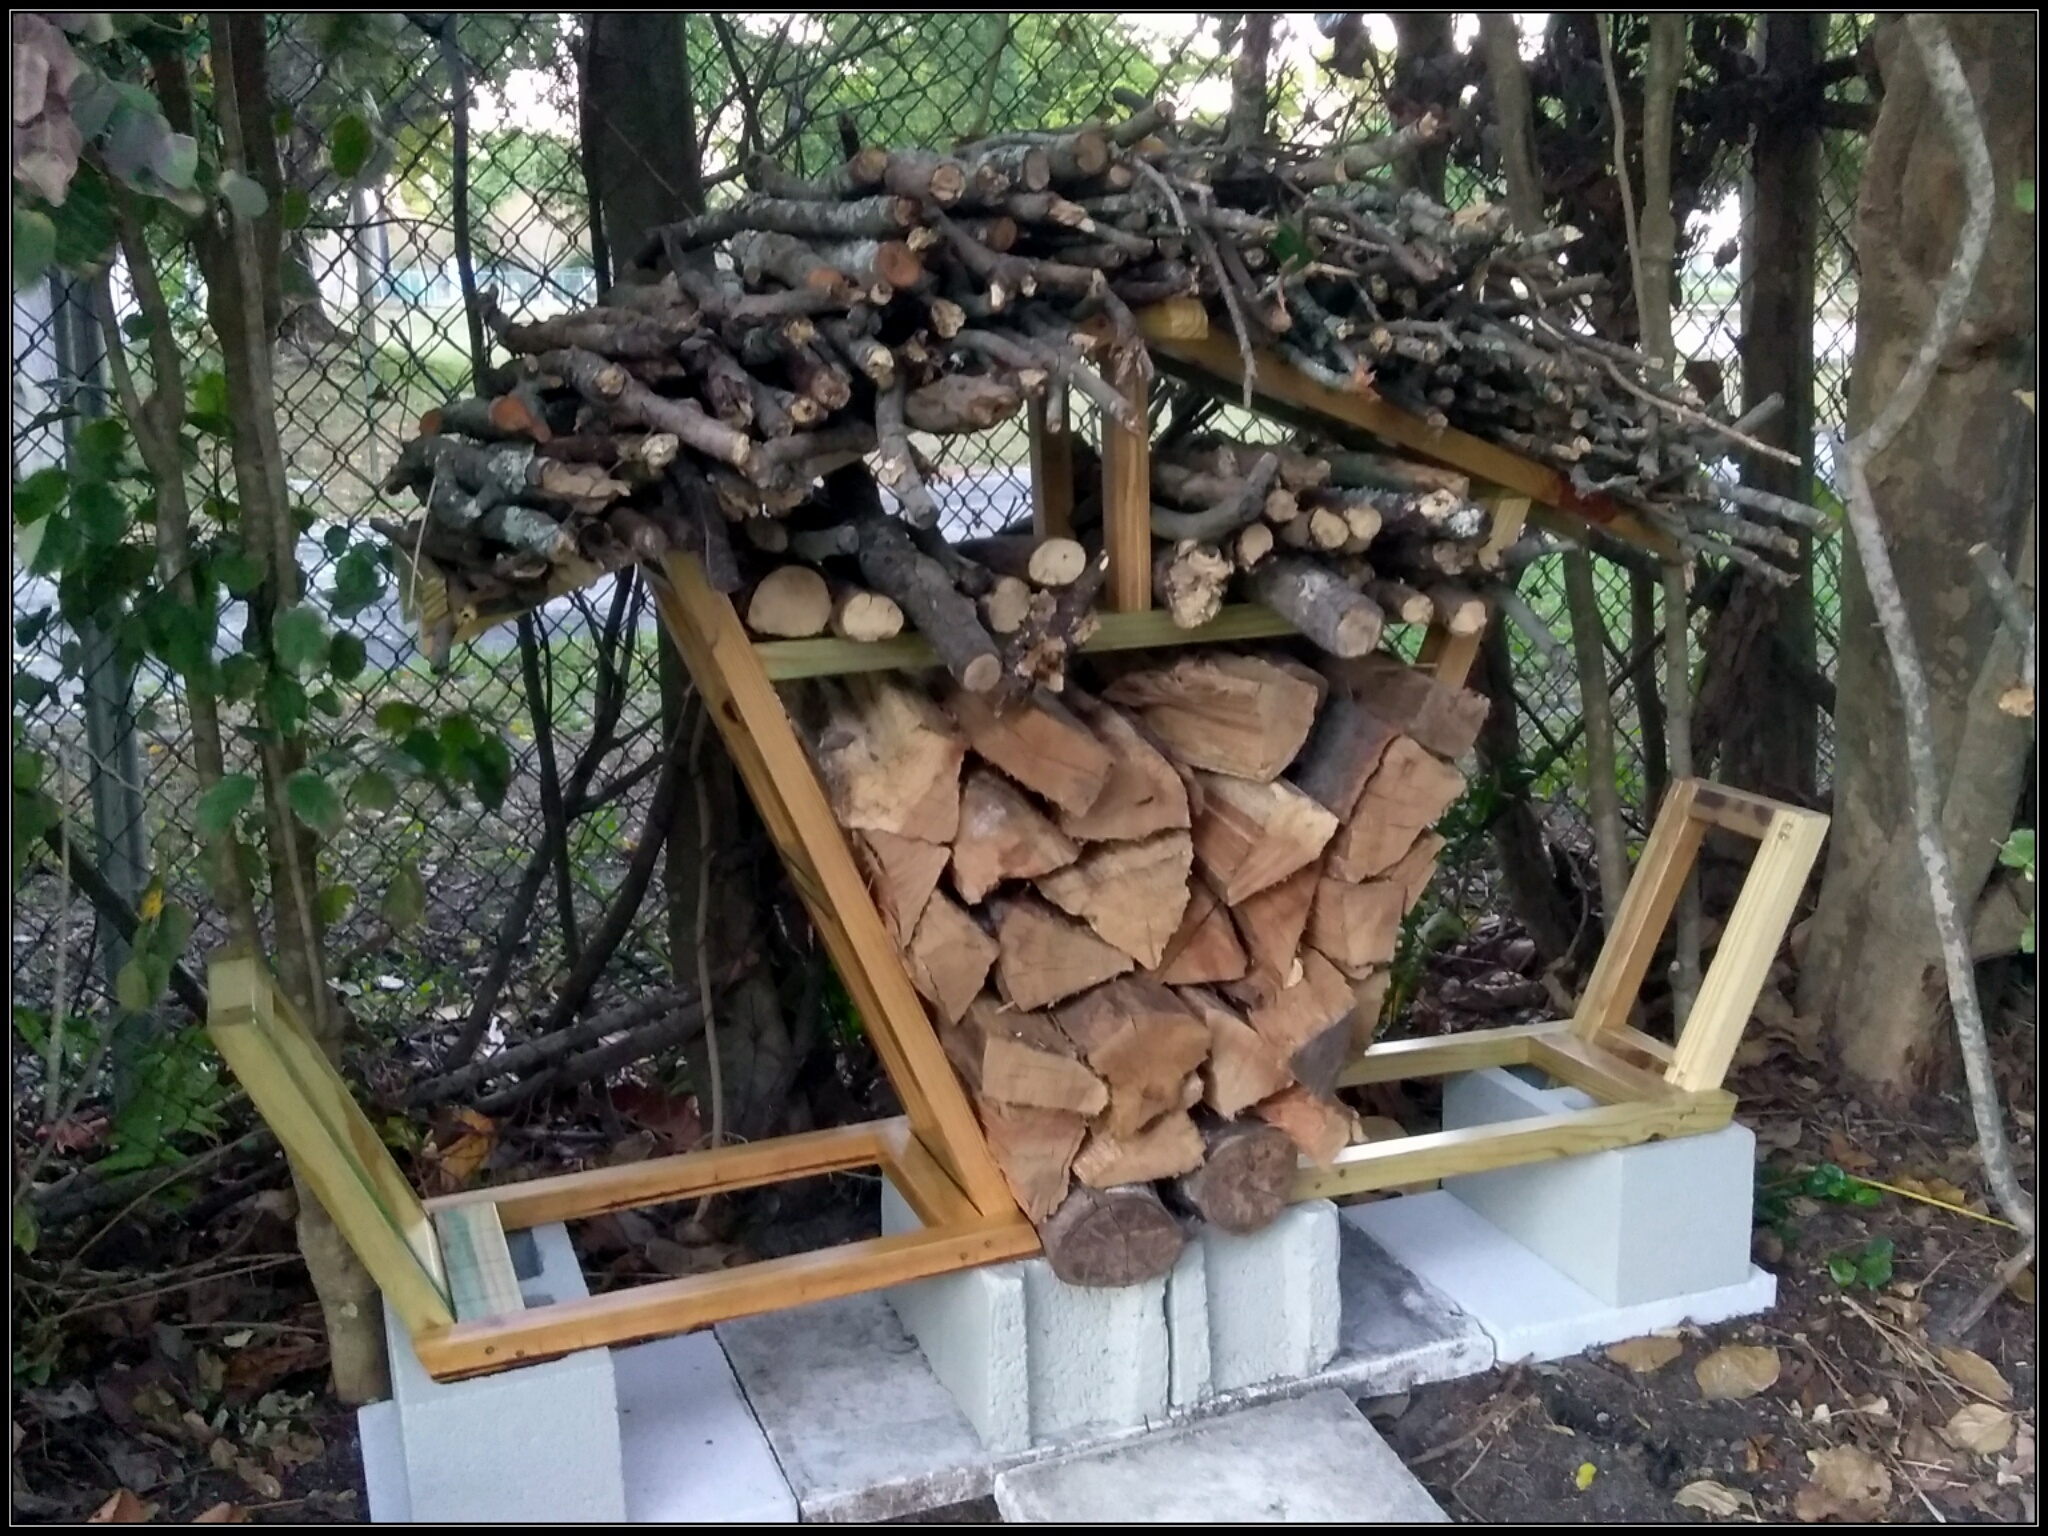
If you haven't read the post on building the Birdhouse Firewood Rack I strongly suggest you do as I'm not going to get into the details of that build and you'll have better understanding of the cuts and angles and the scrap wood I'll be referring to in this post. To recap a tad, this is what the original Birdhouse Firewood Rack looks like:

As you can see above it's made from scrap wood banding skives you can get from the local lumber store as most just throw them away. Home Depot, Lowes and the like go through so much lumber they have dozens of these as they go through pallets of lumber.
The pavers used are 16x16 inch pavers. Three were used in the original along with two old cinder blocks. In adding the extensions I needed two more 16 x 16 inch pavers and two more cinder blocks. The cinder blocks on the original are three hole, the new are two hole. It made no difference on the angle for the end cuts which like the original all angles are cut at 22.5 degrees.
The length of the scrap wood you get and the width you want to make your extensions as well as the height of the uprights, that will determine how many pieces you will need to complete your build. Mine required six pieces and I made sure to get and use ones that were pressure treated. As mentioned in the previous post, they're most times made from the same type lumber they are used to pallet up with.
With four 16 inch pavers across this rack foot print is around 64 inches wide at the base with around a 4 inch overhang for the angle of the uprights on each end. Depth is determined by the length wood you store.
The extensions I made are around 23 or 24 inches wide, the uprights I went with around 22 inches tip to tip.
Place the pavers, paint the cinder blocks to match the house, let the paint dry and place the blocks where you want them.
Make the uprights the same width and manner you did for the Birdhouse Firewood Rack. For mine, which used a three hole cinder block it came to six inches in-between the uprights. If you are using two hole cinder blocks through out, it'll be different.
The uprights are the first thing you want to make. Very simple to make. Cut a 22.5 degree angle on the bottom and another on the top. I did glue them using Tite Bond III when assembling. I used 2.5 inch zinc plated construction screws to hold them together.
Here is what mine looked like once assembled...

I cut a 22.5 degree angle on the cross members to match. The top one positioned flush with the top.
Here it is once placed in the cinder block before finishing.

Once you have it placed in the cinder block where you want it, it's very easy to get a measurement for how long you need to make the actual extension pieces. In fact, if you cut the inside angle, you can just lay it in place and just trace with a pencil the length to the outside of the extension upright. I made all four extensions the same that way they are interchangeable and will work for either side. But I did make the long pieces out of scrap PT 2 x 2 I had. The cross members are from the scrap PT banding skives. Banding groove is faced down on the cross members. Long pieces go to the outside of uprights. The cross members came to around 10 1/4 inches long plus an eighth.
You want to give the extensions about an 1/8 inch of play width wise to allow for swelling. Again I used 2.5 inch zinc plated exterior grade construction screws and glued them with TiteBond III. Here's one assembled.

The cross members on the extension part do have a 22.5 degree angle to match the angles of both the birdhouse rack uprights and the extension uprights. Make sure if you are using the banding scrap wood, you have the banding groove facing down for the correct side before making the angle cut. You need a pair for each side. With the angle on the upright it will fit snug and lock it it position once placed.
Here's a couple shots of the angle cuts on the cross members and ends so they match the uprights.
The first pic is to the outside of the extension...

And below is the side towards the main Birdhouse Firewood Rack upright...

When screwing the cross member supports on, make sure you catch the wood, not the the strap groove. Don't get the screw too close to the edge or you'll split them.
Next - do a dry fit before applying whatever finish you choose to use - if finishing them.

They should be easy to put in and take out and the ends should line up flush with the inside of the main firewood rack uprights and the outside of the extension uprights.
You'll want to sand them at this point if you haven't already prior to assembly. Personally I just hit them with a belt sander with some 80 grit, then a orbital sander with 120. I broke all edges.
For a finish, I'd recommend something like Thompsons Water seal. It's a quick and easy finish to apply and easy to maintain. I didn't go that route hind sight being 20/20 I would have it I had to do it again. I used MinWax Exterior Grade Oil Based Spar Urethane. Four coats including sealer. But you can use what you like... Heck you can paint them if you like.
The main Birdhouse Firewood rack I brushed the finish on, for the extensions I brushed the sealer on and sprayed the top coats and only because I as working on the spray gun as it was clogged and wanted to make sure it was clear and spraying correctly.
Once dry - put it together and you're golden...
Here's a few pics I took after the finish dried and it was assembled.


Now I had mentioned I was thinking of adding these extensions on in the original post on the Birdhouse Firewood Rack at the end. The reason was to have a place to store green wood that needed to season up for the next seasons use. The friend I made this for as a Christmas gift had a friend of hers bring a load of seasoned oak down from her property and it proved to be more than the main firewood rack could hold.
So the extensions have a two fold use, to hold overflow and to hold green wood needing to be seasoned up for the following year. You work out of the main part of the rack for this season and rotate the green wood or any over flow from the extensions into the main Birdhouse if you will, when the season ends. That way the Birdhouse part of the rack stays full with seasoned wood. And new green wood is added to the extensions. Or overflow of seasoned wood if you have it.
And here it is once the overflow and green wood from trimmed trees where added.


Now to just wait for a cold enough day to build a fire here in South Florida! Having had the chimney repaired and swept, my friend is kinda eager to enjoy a glass of wine in front of the fire on a chilly night.
That's all for today. Till next time,
Stay Creative, and most of all Stay Happy!
cheers...
Comments
Post a Comment