Just in time for Christmas...
For the past few months, I've been working on a wheelbarrow full of projects which I completed just in time for Christmas, which is tomorrow, including the wheelbarrow seen above.
All these projects for a very nice person I met a few months back that honestly I felt just needed some help with things she wasn't able to do herself and it was my pleasure to do so. Though I thought I would complete them sooner, the target was to have them completed by Christmas, which I just finished up the bigger project on the 21st. Whew! That's cutting it close.
What started it all was she asked if I'd watch and feed her cats and birds while away as well as house sit. She'd insisted on paying me for it which I felt weird about as I would have done so for the asking. So...
Having seen her backyard was completely overgrown with some type of African Asparagus Fern that has prickers all over it. I'm talking so overgrown you couldn't walk in the backyard. Like this massive brier patch that cloned itself all over everything and into the trees. I knew there was a garden under there so while she was away.. I pulled all those ferns out which self-created a winding path around the garden that was revealed after removal of the ferns. It exposed the garden! It's very cool back there.. now! And she loved it. And in fact, she got out there and pulled ferns and raked what she could to help finish it up.
Here's just a sampling of a small part of her backyard. It's now looking more tropical yet retaining a very lush look. Minus those freaking pricker ferns!
Now the ground tapers down towards the back of the property and we talked about putting some topsoil down to level it and raise the grounds a bit. Just a couple yards. But getting it back there from the front required a wheelbarrow which she didn't have. Coming over to my storage unit to get tools someone pointed out a tenant was moving to a smaller unit and getting rid of a bunch of stuff. Low and behold amongst some vintage power tools and junk was a wheelbarrow. One that I felt was salvageable. And they gave it to me along with some other vintage tools heading to the trash. Not needing a wheelbarrow myself, I gave it to her.
I don't have a picture of the wheelbarrow to start but many of the bolts holding it together were rusted through. The wedge wood under the bucket itself was missing on one side, rotted on the other. The cross support between the legs was bent. The handles two different sizes though the same length.
To start, I cut through the bolts that were rusted, hammered flat and straightened all bent metal including the axle supports. After some prep work, I painted all metal with Rust-Oleum Hammered Metal Black. Going heavy on the legs and front support with some extra coats of paint.
And that was the easy side of the repair. Since the two handles where different dimensions I didn't know what the correct measurements needed for the wedge support piece between the bucket and handles other than length. (circled in the pic below)
At least not until I dry fit everything back together. But before I could test assemble two things needed doing, the handles needed to be at least the same height and I needed the hardware.
Hardware proved more difficult to find than I thought it would be. Originally they used steel carriage bolts throughout. I wanted to go with SS bolts and nylon lock nuts with Truss or Button heads for inside of the bucket. But I couldn't find SS Truss or Button heads in the correct size needed. One day I realized, why not use T-Nuts inside the bucket? Being the bucket is poly, the prong style will bite. And the low profile perfect. (It prevents the shove from catching on the bolt head and why carriage or truss heads are used inside the bucket)
So that's what I went with. And as you can see the bolt goes past through the T-Nut. A cut-off wheel on my Dremel made short work of cutting them off.
A shovel can easily pass right over them.
I don't know what kind of wood the handles are made of but it's a beautiful wood. Is not white oak but of some hard red-colored wood. As mentioned, they were of two different dimensions as ar as height and width. So one needed to be planed down height-wise. I had received some nice hand planes in a trade I did a few months back and had they not been packed away would've worked perfectly as the tool for the job. But... I had received a new tool with this wheelbarrow. One I've never seen or used before. That is a Black and Decker electric hand plane..
It wasn't in the condition you see above but once cleaned up and unclogged I thought I'd give it a try. Setting the handle up for planing being I didn't have a workbench with a vise to plane it on was a little tricky to work out, but once I did, it worked beautifully on this hardwood. I still need to get the hang of it as it wasn't perfectly smooth. I may have run it too fast on the final pass. But it made short work of the job at hand.
Some sealer and 3 coats of oil-based exterior grade urethane and they were ready for dry fitting. Once dry fit and measured, I hand cut the wedges with my little Ryobi cordless circular saw. Painted them black. Drilled the necessary holes. And assembled.
During assembly, I had to drill a couple new holes in the handles as whoever assembled it before didn't square things up, etc, etc.
But it came out solid. And should last a long time. Here are some more pics of the finished wheelbarrow.
One thing cool about this wheelbarrow is the wheel has a grease fitting to grease the axle bearings. Something I didn't see on the new ones in the stores I looked at of late.
And the wheelbarrow was just a small portion of the projects completed.
Another project was a hand made Rocking Horse. A rather large one probably made in someone's home shop. Below you see a couple pics the owner took
Yes, there were issues. Plenty of issues that needed addressing. Such as not only were the wrong screws used but screws too short to hold it together. Splits in the wood joints and large chunks of wood missing behind the legs. Wrong color putty in the screws holes. The tail which originally had been glued at the top with only one screw to hold it in the center had popped off. And the finish had degraded.
Originally I thought they had stained it but discovered it wasn't. I think it's made from Redwood or it could be Dade County Pine that has aged. But I'm not sure which.
Here it is apart and ready for sanding...
I used an Ebony stain to color the tail and add hoofs to the legs...
I repaired splits in the wood on the body by filling it with two-part epoxy. Below is one such repair being made.
For the back of the legs where large chunks where missing I used a combination of wood strips and epoxy to repair the area then sanded them flat. Where knows fell out I formed it up with tape and filled with each shaping the edges once cured. Rather than buying a large piece of wood just to make plugs for the screws, I opted to fill the screw holes with epoxy once I reassembled it. I used a weatherproof glue and the proper length deck screws to reassemble. The epoxy in the screw holes looked real nice compared to the off-color putty originally used. It has a vintage and distressed look but a clean smooth look too it. Especially once the finish was applied.
To apply the finish, I drove a pipe in the ground which allowed me to use one of two dowel holes in the body to mount it. Seen below it's now ready for finish slid into the pipe.
It worked out great for applying the finish in one shot. For a total of 4 coats of finish with one of sealer exterior grade oil-based urethane.
I painted the base with Rust-Oleum oil-based enamel, 6 coats, Hunter Green in color. Pictured below is the base after the first or second coat.
Then I added a piece of trim I used in the kitchen to embellish the base which I left natural with 3 coats of urethane on those.
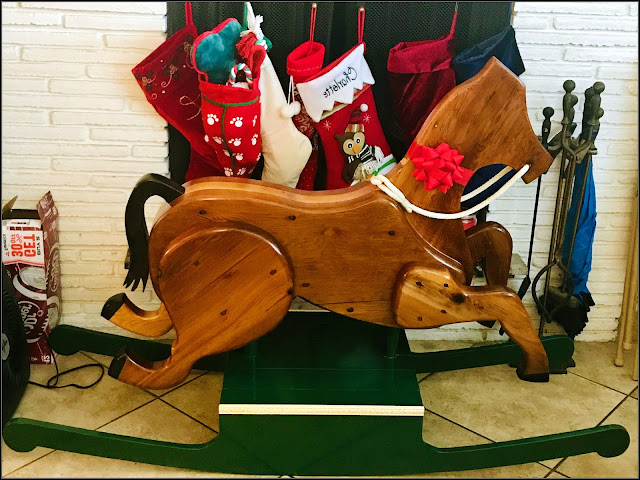
A rope was added for the reins though I will be adding a handlebar to it after Christmas. A bow on the neck since this is a Christmas gift for her granddaughter. Below it is sitting in front of the fireplace Christmas day.. 😀
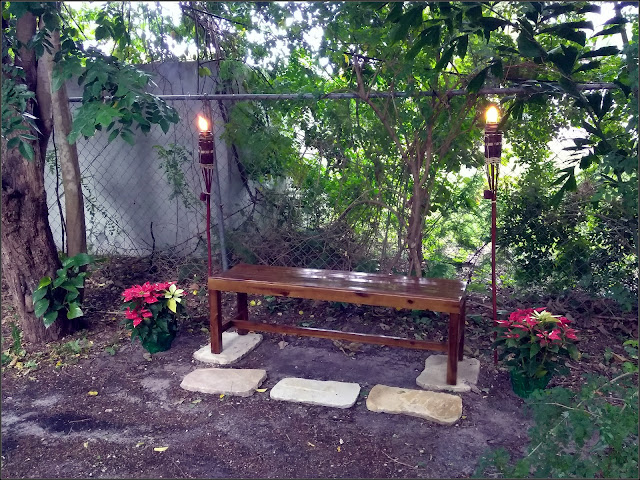
Another project was for the backyard, a curved seat bench bought new. The finish so thin and they finished nothing that wasn't seen, so I refinished it myself properly before putting it outside. Using 3 coats of the same exterior urethane. Adding some stones for the bench to sit on, and for your feet in front of it. Couple of Tiki torches... Some colorful Christmas plants and it made for a nice sitting area in the backyard along the path for her Christmas guests.
I did all these projects in-between other small projects and while working on the big, main project... Refinishing the kitchen cabinets. What started out as a simple, "just refinish the outside" turned into a major project. I mean a major project. They're approximately 50 to 60-year-old cabinets. Solid wood with a veneer face on the doors inside and out as well as the bottom and tops of the cabinets.
There was extensive water damage to all the cabinetry because of a roof leak resulting from tree coming through the roof during a past hurricane. I knew there was a little delamination on the doors and some on the bottom interior but... not near what I found. Repairs everywhere... the below images show just some repairs being done.
Every single door once the finish was removed, delaminated. Every single door had to be re-glued and pressed which I'm not equipped for. So I had to make re-gluing repairs in small sections at a time. Both front and back.
Since damage to the interior top and bottom shelves needed repair, that portion of the interior would need refinishing. Which led to the decision to refinish the whole of the cabinet interior.
And that was just the upper section.
The bottom section not only had water damage but had been butchered by whomever installed the dishwasher. That and apparently they had had a rodent problem which I found the nest. Old nest but still... No support to speak of under the 1/4" bottom throughout the lower cabinets which made zero sense to me. Without support, the bottom would warp regardless over time.
The damage to the bottom cabinet was not only from the roof leak but from a long steming leak from the sink plumbing. I added additional 2x5 supports cut from 2x6 pressure treated lumber and exterior grade finish plywood replaced the entire floor of the cabinet.
Since I went that far, I made a custom area for her cookie sheets seen above.
A big disappointment came in hoping to use the Craftsman table saw I traded for a few months back. It was the main part of the trade for me. Try as I might I couldn't get the fence to square up to the blade. It just wouldn't square up. An aftermarket fence and guide worth a dang will cost more than a new table saw so I don't know what I'll do with it. Back in storage it went. I ripped and cut everything in needed to make the repairs to the bottom by hand using my little 5 1/2"cordless circular saw. A straightedge as a guide for some, a steady hand in others.
The drawers were a mess. Stained and delaminated from water damage, you see what I started with below.
Once repaired and refinished they're a sight better.
All the hardware was all corroded and couldn't be found for replacement. So I boiled them all including screws which were hammered style heads, scrubbed and repainted them all semi-gloss black.
Once cured for a week I then covered all interior shelving with a clear gloss contact shelf covering. The removable type which I must say I like. Not only for protecting the finish but it really looks good. You can barely tell it's there.
What I thought would take two weeks turned into a two-and-a-half-month project. Mainly taking so long because I couldn't apply the finish given the weather... It rained and rained and rained. No Central AC meant humidity inside was pretty dang close to what it was outside. Blushing, a constant issue. Having to wait for the right days to lay finish dragged it on.
With two days to spare the cabinets as well as other projects were completed. Hurray!!
It's the first time I've ever attempted such a project let alone one with these types of issues. I'm very pleased with how they turned out. And the owner seems delighted. Her neighbors who all have similar cabinets built by the same cabinetmaker came by to view them and like how they turned out. Or so they said. lol
Personally, I found it very interesting to see how the cabinet maker built them. Interesting techniques used that I hadn't seen before.
It's Christmas Eve and well... It's time for me to relax. Her family and friends are all over her house this evening... Hopefully enjoying everything I did. It's the first viewing of everything by the family.
😀
Merry Christmas everyone...
Stay creative... Stay Happy.
Cheers...
UPDATE:
Since Christmas I made some planned additions to the Rocking Horse I thought I'd share. Namely the saddle and handle grips.
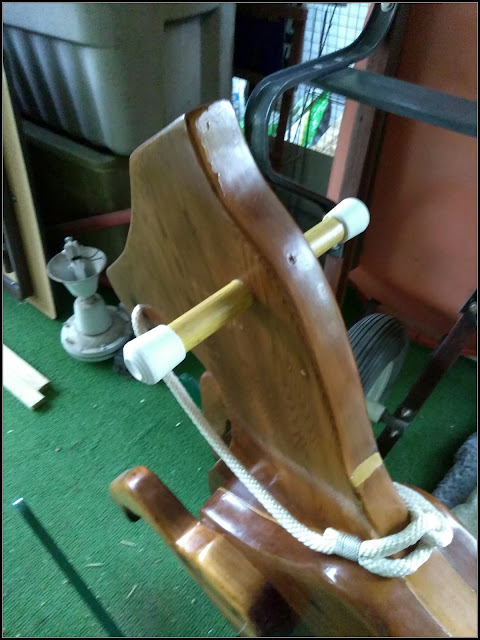
The handle grip I made from an old broom handle and then added chair feet to each end. The reins look great but the handles are really what is needed to ride it.
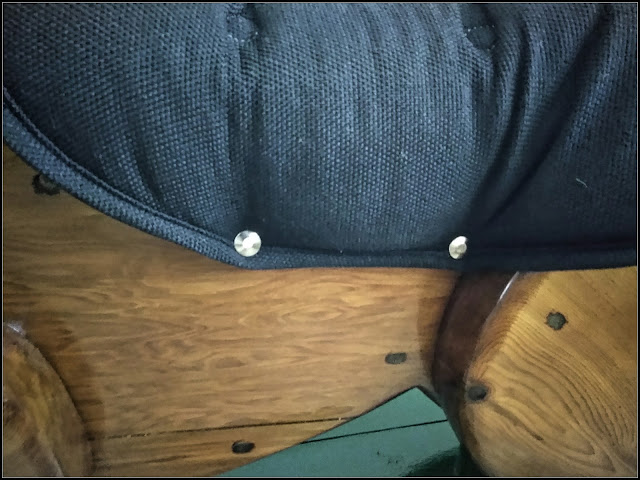
For comfort I added a "saddle" if you will. The saddle is simply a chair seat cushion. Once wrapped it really does look like a saddle.
It's held in place with two snaps I put in on each side.
If it needs cleaning, it's easy enough to take off and toss in a washing machine if so desired.
The womans grandchild, who is about 2 years of age, rides the dickens out of this rocking horse everytime she comes to visit. I may have to modify the rockers a bit as she rides it so rigorously it scoots right across the floor due to it hitting the front and rear rocker stops as she rocks it back and forth. To be honest, I thought she was too small to even rock it, boy did she proved me wrong! lol
Till next time...


My "new" cabinets are my pride and joy! I never thought I'd see them gleaming like new again. I'm the envy of all the neighbors who also have 65-yr-old original cabinets.
ReplyDeleteBut this project turned out to be SO much more than you bargained for! With all the hidden water damage, sagging cabinet bottoms, splits in shelves, delaminating doors, etc. , it was looking like a nightmare job. Thank you, Chase, for your perseverance, creative solutions, attention to the smallest details, and amazing talent (not to mention the often back-breaking sweat equity!)
The cabinets are actually better than new...with the modifications, additional shelf and other improvements you suggested.
I could not be happier, or more grateful.
Cheers to you, my friend!