DIY Custom Thumb Pads for your LP TX
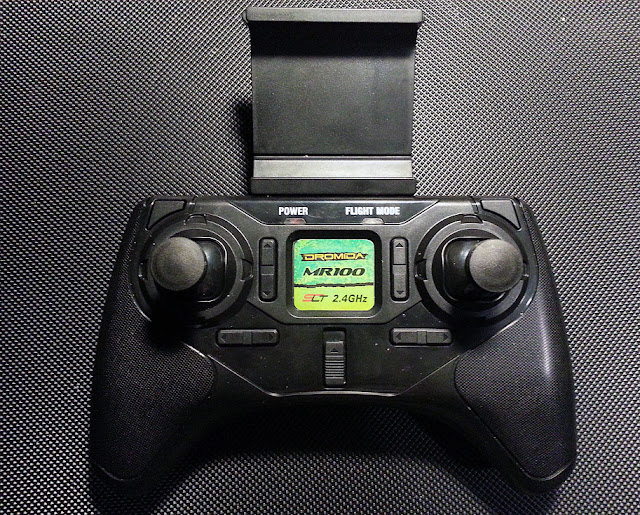
Some people like the pinch method when using their RC TX's, I like the thumb method, especially on the little Low Power TX's that come with the smaller RC RTF's. Since they don't come with thumb pads most times, I made my own as seen below on my Dromida MR100 LP TX. I thought I'd share it with you all as it's real easy to do.
Cost is around .70 cents a set. You can further mod them at will. But be warned, once you go down this path there is no turning back as you'll be gluing these thumb pads to the stock stick and once done that's it. So be sure it's something you think you'll like.
What we're making is what you see above.
Personally I really like them so... If you like the feel of a gaming thumb pad controller you'll probably feel more comfortable with this styple, if you've never tried a small gaming controller, try them out on one of your TX's. If you like them, do it to your other TX's. I made a set for both my LP TX's as well as a removable set for my Full range TX, which is a similar but different build method.
Okay lets move on to making them.
What you'll need:
One set of Plastic Hinged Screw Caps per TX. - I used 1/4 inch. You may want smaller. You may want a different color as they do come in white, brown, black etc. Or you can paint them and I'll go over that later.
Here's a pic of what I'm talking about and you can get them at Lowe's or Home Depot, Ace Hardware for less than .70 cents a pair usually.
You'll need Loctite Super Glue for Plastic - it comes as a two part. One is the prep the other the glue.
You'll need the gel type super glue as well as the thin kind.
You'll need a drill and I used an easy out counter sink bit. At least that is what I was told it was.
You can use a regular countersink bit if it's small enough to fit inside.
Here's a pic of the countersink/easy out tool I used.

You'll need a sharp Xacto Knife Hobby knife to remove the burs off the plastic once drilled out.
The LP TX of course... In this t utorial of sorts I'm doing it to my Blade/Spektrum MLP4DSM. I also did it to my Dromida Vista Stock LP TX.
That's it for tools and parts.
First step is to remove the stock sticks from the LP TX. Most are just pushed in so a little twist and they come right out. Once you have them out, set them aside but keep them close as you'll need them through out the process.
Next you want to drill out/ counter sink the hole in the hinged screw cap from the inside so they fit real tight on the stock sticks. Go super slow drilling them out. Drill a little - test fit - drill a little more - test fit. Keep doing this till they fit and I mean fit real tightly. If you went too far - go get another set. They won't hold.
Once you have them counter sunk and they fit the sticks, you'll probably see some burring going on both on the inside and outside.
Leave the burrs on the inside. Only remove the ones on the back side to make them flush.
Next comes the gluing.
First we'll use the Gel Type super glue. This will fill any voids in the hole and around the stick if it's grooved.
Practice fitting it first and getting it level because you only have one shot at this and the glue sets quick! So try it a couple times to get the hang of putting it on the stick and getting it set straight and level.
Okay - ready? - lets glue them up...
Use the prep stick on both parts - wait 60 seconds as it states and put the glue on the stick! Not the cap - carefully slide the stick in the hole you made in the cap the right way and grab it with your other hand. Spin the stick and check level - move quick and make adjustments fast as you only have a couple seconds and the glue is going to set.
Put away the Gel Super Glue - you're done with it.
Grab the thin type super glue once the glue is dry from the last step. It'll take several minutes I found. Like ten...
Put a thin bead around the back side of cap and stick were they meet/join like so...
Put away everything but the eXacto knife while it dries.
Next - cut the little tab/tail off the cap which probably came off the body when you drilled out the hole. If it didn't come off and is still attached, just leave them attached and put the cap on. If it did come off like mine did, cut it off flush.
Like so...
Next - put the cap on the body. It snaps on.
And your almost done...
Now is the time to paint them if you want to. Or later - they come off easy enough so it's up to you.
If you're going to paint them...
You can use Krylon Fusion Paint for Plastic or... better still.
PlastiDip - either in a can or the Dip. Which will give you a rubber coating. In just about any color you can think of. How cool is that!
Just lightly sand them - wipe them down and paint them or dip 'em.
Once dry...
All you have to do is put them back on the TX.
They go in as easy as they came out. Just give them a little twisting motion and they'll go right in. DON'T force them in - just firmly twist them in.
That's it - now put everything away and go try 'em out!
Hope you enjoy your new Thumb Pads on your TX.
That was easy enough a mod wasn't it!?!
Till next time...
Stay creative my friends,
- chase -

Cost is around .70 cents a set. You can further mod them at will. But be warned, once you go down this path there is no turning back as you'll be gluing these thumb pads to the stock stick and once done that's it. So be sure it's something you think you'll like.
What we're making is what you see above.
Personally I really like them so... If you like the feel of a gaming thumb pad controller you'll probably feel more comfortable with this styple, if you've never tried a small gaming controller, try them out on one of your TX's. If you like them, do it to your other TX's. I made a set for both my LP TX's as well as a removable set for my Full range TX, which is a similar but different build method.
Okay lets move on to making them.
What you'll need:
One set of Plastic Hinged Screw Caps per TX. - I used 1/4 inch. You may want smaller. You may want a different color as they do come in white, brown, black etc. Or you can paint them and I'll go over that later.
Here's a pic of what I'm talking about and you can get them at Lowe's or Home Depot, Ace Hardware for less than .70 cents a pair usually.
 |
| One set of Plastic Hinged Screw Caps |
You'll need Loctite Super Glue for Plastic - it comes as a two part. One is the prep the other the glue.
You'll need the gel type super glue as well as the thin kind.
You'll need a drill and I used an easy out counter sink bit. At least that is what I was told it was.
You can use a regular countersink bit if it's small enough to fit inside.
Here's a pic of the countersink/easy out tool I used.

You'll need a sharp Xacto Knife Hobby knife to remove the burs off the plastic once drilled out.
The LP TX of course... In this t utorial of sorts I'm doing it to my Blade/Spektrum MLP4DSM. I also did it to my Dromida Vista Stock LP TX.
That's it for tools and parts.
First step is to remove the stock sticks from the LP TX. Most are just pushed in so a little twist and they come right out. Once you have them out, set them aside but keep them close as you'll need them through out the process.
Next you want to drill out/ counter sink the hole in the hinged screw cap from the inside so they fit real tight on the stock sticks. Go super slow drilling them out. Drill a little - test fit - drill a little more - test fit. Keep doing this till they fit and I mean fit real tightly. If you went too far - go get another set. They won't hold.
Once you have them counter sunk and they fit the sticks, you'll probably see some burring going on both on the inside and outside.
 |
| Remove the burs off the back side only to make it nice and flush |
Leave the burrs on the inside. Only remove the ones on the back side to make them flush.
Next comes the gluing.
First we'll use the Gel Type super glue. This will fill any voids in the hole and around the stick if it's grooved.
Practice fitting it first and getting it level because you only have one shot at this and the glue sets quick! So try it a couple times to get the hang of putting it on the stick and getting it set straight and level.
Okay - ready? - lets glue them up...
Use the prep stick on both parts - wait 60 seconds as it states and put the glue on the stick! Not the cap - carefully slide the stick in the hole you made in the cap the right way and grab it with your other hand. Spin the stick and check level - move quick and make adjustments fast as you only have a couple seconds and the glue is going to set.
 |
Plastic Prep/Activator and Gel Glue
Cap Glued on the Stock LP TX Stick and level.
Whew!!
|
Once both are glued on set them aside - go get a drink of something and let them dry for a minute or two.
Next add some of the gel type glue to the inside around the stock stick crown where it meets the screw cap as you see below. This will give them strength.
 |
| Gel Super Glue added to the inside around the crown of the stock LP stick. |
Grab the thin type super glue once the glue is dry from the last step. It'll take several minutes I found. Like ten...
Put a thin bead around the back side of cap and stick were they meet/join like so...
 |
| A thin bead of the thin type super glue added to the back side of the cap were it meets the stick. |
Next - cut the little tab/tail off the cap which probably came off the body when you drilled out the hole. If it didn't come off and is still attached, just leave them attached and put the cap on. If it did come off like mine did, cut it off flush.
Like so...
 |
| Remove the tail on the cap if your came off. |
And your almost done...
 |
| Completed and ready to go back on the TX. |
Now is the time to paint them if you want to. Or later - they come off easy enough so it's up to you.
If you're going to paint them...
You can use Krylon Fusion Paint for Plastic or... better still.
PlastiDip - either in a can or the Dip. Which will give you a rubber coating. In just about any color you can think of. How cool is that!
Just lightly sand them - wipe them down and paint them or dip 'em.
Once dry...
All you have to do is put them back on the TX.
They go in as easy as they came out. Just give them a little twisting motion and they'll go right in. DON'T force them in - just firmly twist them in.
 |
| Thumb Pads completed and installed on the Blade LP TX. |
That's it - now put everything away and go try 'em out!
Hope you enjoy your new Thumb Pads on your TX.
That was easy enough a mod wasn't it!?!
Till next time...
Stay creative my friends,
- chase -
Comments
Post a Comment